ShopDreamUp AI ArtDreamUp
Deviation Actions

Post Processing 2
Sooooo…..It’s been about 3 months (I think) since my first tutorial and I’ve learnt a lot from photoshop in the mean time! So this is the improvement on my first tut and I’ll be going a bit more into using layers and levels to achieve better and more dynamic color range in your photos.
Firstly, my disclaimer to all you critics out there. I have split landscape photography into 2 main genres. The first group show you nature as it is, they do very little processing and their photos always have a very clean, natural look. Good examples are wingmar , kkart , lonelywolf2
:thumb56734453: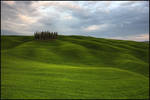
.The second group have a more artistic approach to their photography. They use a variety of cokin or lee creative filters, IR filters, strong ND filters and my favorite, Photoshop to make their photos more interesting and ‘artistic’. Good examples are myself hougaard , gilad , werol , KariLiimatainen .


Now, no one can criticize the methods I am about to explain on making your photos more ‘interesting’ !! (Smile)")
Secondly, to use this tutorial you must be able to shoot in RAW, because many times different parts of the images need slightly different exposures and you can achieve this with the RAW tool, with minimal loss of quality.
I recommend you read my previous tut before reading this one. Here it is news.deviantart.com/article/35…
Thirdly, Photoshop CS3. If you have CS2 then you’ll need to download the RAW tool plug-in which you can find at www.adobe.com .
I’m not gonna explain how to open images or crap like that. This is not a tutorial for morons.
So let’s get started!
1.Open the image your going to process, If it’s a RAW file and you have the PS RAW tool then it should open in the RAW tool.
There is never any correct amount, it’s all personal opinion and what looks right to you. So whenever I say adjust something, you decide how much. You will learn what is the right amount over time.
Adjust the following as much as(and IF) necessary.
White balance
Exposure
Blacks
Contrast
Vibrance
The following Isn’t necessary, it can just add a little touch of vibrance or color to you photos.
.Above all the sliders you’ll see a row of tabs that you can click on for other adjustments. I only ever use one, and that’s the one that looks like a coil: HSL/grayscale. That’s a confusing synonym for ‘messing around with the color’. Play around with the hue until your happy, but never adjust too much. Now at the top of the sliders there’s another sub-row of tabs. LEAVE SATURATION OUT. Go to luminance, play around, not too much though.
1a.In the case of a panorama, open all images to be stitched. Top left, click ‘select all’. Make the adjustments, save as PSD’s (doesn’t lose quality when saving, JPEG does). Merge them, layerflatten image. Crop the image, save the merged, cropped pano as a PSD and delete the PSD’s you just merged it from(they take a LOT of space). Now close it and open the merged pano PSD you just saved in the last step. This is so you can use the history brush.
You’re now finished with the RAW tool, open image.
The problem you now face with most images is that you want to enhance certain areas of the photo in certain ways. How do you do this?
Layers…what is a layer exactly? Don’t be an idiot. It’s a layer! And layers are probably photoshop’s nr.1 key to success. You can put 500 layers on top of each other, and in the case of a photo it will always be copies of the same photo on top of each other.
2.Open the layer window. If you really don’t know how….press F7 and I will magically open it for you.
3.So decide how many parts of the image you want to edit separately and press ctrl+J to make copy layers, as many as you need + an extra one for last minute corrections.
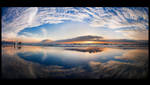
Now I’m going to guide you through the processing of my most recent image because it required the sky, ground and branch to have separate editing so it’s a good example.
:thumb76081703:
Firstly the most recent one, which is a pano. I did everything as explained in step 1a. then step 2 and then step 3, to create four layers. one for the sky, one for the ground, one for the branch and one for any ‘oopsies’.
4.Edit the sky using the levels tool (ctrl+L), Do the RGB, then click the tab to select the levels of each color and then edit each color separately to get the color, tone and exposure that looks ideal to you. Make any other adjustments (curves, selective color etc.) to this layer.
5. Now that you can differ between the top layer (the one your looking at) and the one beneath it you can apply your first gradient mask.
At the bottom of the layers window you’ll see a rectangle with a circle in it. click it. you’ll see that a blank rectangle appeared next to the top layer. That’s your layer mask.
6.Now select the gradient tool by pressing G.
You’ll get to know gradients as you use them more but to start click a short distance above the horizon and drag it a short distance below the horizon. See the result? You now revealed the bottom half of your top layer and what you now see is the layer below it.(to undo and try again simply press ctrl+alt+Z) You can reveal the top half simply by dragging the gradient the other way. You can create the gradient in any direction, opacity etc. Play around with the settings above the window!
7. Now in the levels window, select the 2nd layer. Edit it for the ground as in step 4.
8.If there is anything in the area of the horizon like a tree that’s sticking into the sky but but must have the same editing as the ground then you can either erase part of the mask(remember to select the mask in the layers tool) or you can use the history brush.
If you have a simple photo in which only the ground and sky needed separate editing then you’re finished now. If you don’t want to lose you work, Save as a PSD at full resolution(if you don’t, you always regret it).
9.If your photo has another subject that needs it own editing then you’ve still got some work to do. Click on the top layer in the layer window and press ctrl+E to merge the 2 top layers.
In my case, the branch still needed editing, I wanted to give it a reddish color to bring some more color to the photo. 2 ways to go about this.
9a. One is to select the branch with whatever lasso tool you prefer(3rd tool from the top, right click to select a specific one). Select the object. Now you’ll see, above the image there’s a tab that says ‘refine edge’. Click it and play around with the setting to well….refine the edge.
Now you can just erase the object without a worry from your top layer to reveal the object from the layer beneath.
9b. The other way is to just erase it carefully, select the fine edged brush and start with a big brush, erase the center, select a smaller brush and move closer to the edge and so forth and so forth….
Both take time and patience. Effectiveness varies depending on the subject. If the object is well defined and isolated then I advise you use the first way.
10. Now that you’ve erased the object from the top layer and you see the object from the layer beneath it you can select that layer in the levels window and do the necessary editing to your object.
And at the end of all that my photo was finished. The original was 7000*3500 pixels and when you do your processing at that scale and you upload something like a 1200*700 to DA then most rough edges are unvisible and disappear. If you know that someone’s gonna buy a huge print then you better be more careful!
11. I Then pressed ctrl+E again to merge the top 2 layers and I still had one beneath the top layer(which is now the merged top 3). This bottom layer still has nothing done to it except the RAW adjustments. If you’re top layer has anything that went wrong in the editing like a rough edge, blown highlight, a shadow that’s too dark. Whatever. Eraser or history brush can usually fix it.
Always save a full resolution PSD of your completed work because for certain photos this can take an hour or even more.
And go through my previous tut news.deviantart.com/article/35… because it covers smaller useful things in PS and some steps that I don’t properly explain in this one.
Some useful things about photoshop….
Practice makes perfect!
Don’t stick to what you know, experiment!
Photoshop is like maths, there’s a hundred ways to get to the same result!
Sooooo…..It’s been about 3 months (I think) since my first tutorial and I’ve learnt a lot from photoshop in the mean time! So this is the improvement on my first tut and I’ll be going a bit more into using layers and levels to achieve better and more dynamic color range in your photos.
Firstly, my disclaimer to all you critics out there. I have split landscape photography into 2 main genres. The first group show you nature as it is, they do very little processing and their photos always have a very clean, natural look. Good examples are wingmar , kkart , lonelywolf2
:thumb56734453:
.The second group have a more artistic approach to their photography. They use a variety of cokin or lee creative filters, IR filters, strong ND filters and my favorite, Photoshop to make their photos more interesting and ‘artistic’. Good examples are myself hougaard , gilad , werol , KariLiimatainen .
Now, no one can criticize the methods I am about to explain on making your photos more ‘interesting’ !!
Secondly, to use this tutorial you must be able to shoot in RAW, because many times different parts of the images need slightly different exposures and you can achieve this with the RAW tool, with minimal loss of quality.
I recommend you read my previous tut before reading this one. Here it is news.deviantart.com/article/35…
Thirdly, Photoshop CS3. If you have CS2 then you’ll need to download the RAW tool plug-in which you can find at www.adobe.com .
I’m not gonna explain how to open images or crap like that. This is not a tutorial for morons.
So let’s get started!
1.Open the image your going to process, If it’s a RAW file and you have the PS RAW tool then it should open in the RAW tool.
There is never any correct amount, it’s all personal opinion and what looks right to you. So whenever I say adjust something, you decide how much. You will learn what is the right amount over time.
Adjust the following as much as(and IF) necessary.
White balance
Exposure
Blacks
Contrast
Vibrance
The following Isn’t necessary, it can just add a little touch of vibrance or color to you photos.
.Above all the sliders you’ll see a row of tabs that you can click on for other adjustments. I only ever use one, and that’s the one that looks like a coil: HSL/grayscale. That’s a confusing synonym for ‘messing around with the color’. Play around with the hue until your happy, but never adjust too much. Now at the top of the sliders there’s another sub-row of tabs. LEAVE SATURATION OUT. Go to luminance, play around, not too much though.
1a.In the case of a panorama, open all images to be stitched. Top left, click ‘select all’. Make the adjustments, save as PSD’s (doesn’t lose quality when saving, JPEG does). Merge them, layerflatten image. Crop the image, save the merged, cropped pano as a PSD and delete the PSD’s you just merged it from(they take a LOT of space). Now close it and open the merged pano PSD you just saved in the last step. This is so you can use the history brush.
You’re now finished with the RAW tool, open image.
The problem you now face with most images is that you want to enhance certain areas of the photo in certain ways. How do you do this?
Layers…what is a layer exactly? Don’t be an idiot. It’s a layer! And layers are probably photoshop’s nr.1 key to success. You can put 500 layers on top of each other, and in the case of a photo it will always be copies of the same photo on top of each other.
2.Open the layer window. If you really don’t know how….press F7 and I will magically open it for you.
3.So decide how many parts of the image you want to edit separately and press ctrl+J to make copy layers, as many as you need + an extra one for last minute corrections.
Now I’m going to guide you through the processing of my most recent image because it required the sky, ground and branch to have separate editing so it’s a good example.
:thumb76081703:
Firstly the most recent one, which is a pano. I did everything as explained in step 1a. then step 2 and then step 3, to create four layers. one for the sky, one for the ground, one for the branch and one for any ‘oopsies’.
4.Edit the sky using the levels tool (ctrl+L), Do the RGB, then click the tab to select the levels of each color and then edit each color separately to get the color, tone and exposure that looks ideal to you. Make any other adjustments (curves, selective color etc.) to this layer.
5. Now that you can differ between the top layer (the one your looking at) and the one beneath it you can apply your first gradient mask.
At the bottom of the layers window you’ll see a rectangle with a circle in it. click it. you’ll see that a blank rectangle appeared next to the top layer. That’s your layer mask.
6.Now select the gradient tool by pressing G.
You’ll get to know gradients as you use them more but to start click a short distance above the horizon and drag it a short distance below the horizon. See the result? You now revealed the bottom half of your top layer and what you now see is the layer below it.(to undo and try again simply press ctrl+alt+Z) You can reveal the top half simply by dragging the gradient the other way. You can create the gradient in any direction, opacity etc. Play around with the settings above the window!
7. Now in the levels window, select the 2nd layer. Edit it for the ground as in step 4.
8.If there is anything in the area of the horizon like a tree that’s sticking into the sky but but must have the same editing as the ground then you can either erase part of the mask(remember to select the mask in the layers tool) or you can use the history brush.
If you have a simple photo in which only the ground and sky needed separate editing then you’re finished now. If you don’t want to lose you work, Save as a PSD at full resolution(if you don’t, you always regret it).
9.If your photo has another subject that needs it own editing then you’ve still got some work to do. Click on the top layer in the layer window and press ctrl+E to merge the 2 top layers.
In my case, the branch still needed editing, I wanted to give it a reddish color to bring some more color to the photo. 2 ways to go about this.
9a. One is to select the branch with whatever lasso tool you prefer(3rd tool from the top, right click to select a specific one). Select the object. Now you’ll see, above the image there’s a tab that says ‘refine edge’. Click it and play around with the setting to well….refine the edge.
Now you can just erase the object without a worry from your top layer to reveal the object from the layer beneath.
9b. The other way is to just erase it carefully, select the fine edged brush and start with a big brush, erase the center, select a smaller brush and move closer to the edge and so forth and so forth….
Both take time and patience. Effectiveness varies depending on the subject. If the object is well defined and isolated then I advise you use the first way.
10. Now that you’ve erased the object from the top layer and you see the object from the layer beneath it you can select that layer in the levels window and do the necessary editing to your object.
And at the end of all that my photo was finished. The original was 7000*3500 pixels and when you do your processing at that scale and you upload something like a 1200*700 to DA then most rough edges are unvisible and disappear. If you know that someone’s gonna buy a huge print then you better be more careful!
11. I Then pressed ctrl+E again to merge the top 2 layers and I still had one beneath the top layer(which is now the merged top 3). This bottom layer still has nothing done to it except the RAW adjustments. If you’re top layer has anything that went wrong in the editing like a rough edge, blown highlight, a shadow that’s too dark. Whatever. Eraser or history brush can usually fix it.
Always save a full resolution PSD of your completed work because for certain photos this can take an hour or even more.
And go through my previous tut news.deviantart.com/article/35… because it covers smaller useful things in PS and some steps that I don’t properly explain in this one.
Some useful things about photoshop….
Practice makes perfect!
Don’t stick to what you know, experiment!
Photoshop is like maths, there’s a hundred ways to get to the same result!
It's Alive!
I am very guilty of not interacting with all the wonderful people on this site as I used to in the good old days. It is however impossible to try and make it in the professional world and keep your profiles on so many different communities alive. I am very active on facebook and I post all my recent travels, photos and everythings there. If you ever have any questions regarding specific photos or just photography in general then I am always happy to help out!
So join my facebook page - http://www.facebook.com/pages/Hougaard-Malan-Photography/167651333269100
:):):)
Another Part of South Africa
When I joined DA about 4 years ago, there were barely any South African landscapes on here. With time more and more was added of all the typical iconic places, but there's very little work of Kwa Zulu Natal on here. There's a deviant doing some great work of that area's amazing landscapes and his portfolio is greatly under appreciated. So go check out the work of ~carlosthe (https://www.deviantart.com/carlosthe)!
:thumb274051511: :thumb281251657: :thumb280059199: :thumb281907916:
Updates + Win a Print
I have chosen a lucky number between 475-500 and that number person to like my facebook page will get a free print of their choice. It's at 452 now, so the lucky number is just around the corner. You have to prove your number with a screen shot that shows the amount of likes on the page after you have liked it.
In the unlikely event that people unlike and like it so frantically that I get the same number more than once, the prize will go the first person to show me the number. Just mail me your screenshot to hougaard@hougaardmalan.com
I tried to keep up with comments on images, but if I leave it for just a few days it quickly goes into hund
Prints Sale + Win a Print + Facebook Features
I'm having a 2 for 1 print sale on my website until the 25th :) Check out my Blog for more information
I have chosen a lucky number between 475-500 and that number person to join my facebook page wins a free print, so get it to 500 asap! I will announce the lucky number once the group reaches 500 (yes you can leave and rejoin, you need a screen shot to claim your prize!)
Promised features below :)
:thumb175960852::thumb264443915::thumb193550702::thumb56371556::thumb262512584::thumb182093100::thumb180334641:
© 2008 - 2024 hougaard
Comments24
Join the community to add your comment. Already a deviant? Log In
thnx soo much for your time and hufe effert
try videos its easier for u
try videos its easier for u